Guides
Show an automation demo without borrowing a customer’s inbox
A useful demo lets a viewer connect a specific input with a supported result. It should also make clear whether they are seeing an editor preview, a staged test or a live delivery. Those are different kinds of evidence, even when the screen recording looks convincing.
Published by ReplyMagnet · Last updated
Choose one thing the viewer should understand
Demonstrate a bounded capability with a visible cause and effect. A short demo should not imply that every part of a larger business process happens inside the product.

Generated editorial illustration of staging a demonstration. It is not product footage, a customer scenario or a performed test.
Imagine an agency explaining a two-resource conversation: a person chooses a preparation checklist or a comparison guide, and the configured route points them to the selected resource. The demo’s job is to explain that choice and routing behavior.
It does not need to prove that the person read the resource, qualified as a lead or bought a service. Those later outcomes require different evidence. Keeping the demonstration narrow makes it easier to show the actual behavior without replacing missing steps with persuasive narration.
This article provides a fictional production plan. It does not claim that the described recording or test has been performed. The storyboard and data inventory are tools for preparing an honest demo of a capability you have verified.
Write the viewer’s learning objective before opening the recorder: “The viewer can identify the two choices and explain which destination each selects.” A broader objective such as “show how the product transforms the business” invites claims that a short recording cannot establish.
The setup guide covers configuring a supported workflow. Demo production is different work: deciding what the recording actually proves and how to present it without exposing unrelated information or implying unsupported outcomes.
Prepare example data as deliberately as the script
Use authorized demo accounts, fictional resource content and a clean recording surface. Avoid relying on later blur edits to protect a real customer environment.
Create a small inventory of everything that could appear: account names, messages, file titles, resource destinations, browser tabs, notifications and any settings panel you plan to open. Use only the information needed to explain the capability.
For the fictional two-resource scenario, the resources can be clearly labeled demonstration pages. Their content should match the names shown in the conversation. A “preparation checklist” button that opens an unrelated homepage breaks the cause-and-effect explanation even if the click works.
Use a permitted test account or other authorized test arrangement for any actual delivery. Do not send unexpected messages to real customers merely to make the demonstration look active. A customer’s existing conversation is not a convenient substitute for a prepared example.
Before recording, inspect the entire visible area. Close unrelated tabs and suppress notifications through the appropriate device settings. Keep credentials, account identifiers, emails and private conversations out of the shot. If a settings panel is unnecessary, leave it out of the storyboard rather than planning to obscure every sensitive field later.
A generated illustration can introduce the concept, but it cannot stand in for an authentic product screenshot. If you use a mockup to explain an idea, label it as an illustration or concept and keep it distinct from footage of the actual product.
Demo-data inventory for the fictional two-resource recording. These are preparation requirements, not records of a performed test.
Visible material
Account and workspace
- Use in the demo
- Authorized demonstration context
- Exclude
- Customer inboxes and unrelated account details
Visible material
Conversation text
- Use in the demo
- Fictional resource request and choices
- Exclude
- Real private messages
Visible material
Resource pages
- Use in the demo
- Clearly named demonstration destinations
- Exclude
- Paid or private customer files
Visible material
Settings
- Use in the demo
- Only controls needed for the explanation
- Exclude
- Tokens, keys and unnecessary identifiers
Visible material
Browser and device
- Use in the demo
- Clean recording surface
- Exclude
- Notifications and unrelated tabs
Visible material
Evidence note
- Use in the demo
- Date, version and exact mode shown
- Exclude
- Unsupported claims about results
Write the label before recording the mode
Call a preview a preview and a controlled delivery test a controlled test. The label should stay attached to the footage wherever it is reused.
ReplyMagnet’s flow Preview checks configured conversation logic. It does not send messages, establish live delivery or persist live contact outcomes. A recording of Preview can demonstrate how a branch is configured to behave, but cannot prove that a real Instagram message arrived.
If Preview is what you record, place “Preview: logic demonstration” visibly in the video and describe the boundary in the caption or narration. Do not rely only on a small note at the end after the viewer has watched what looks like a real conversation.
If you perform an authorized live test, label it as a controlled test using demo data. Show the evidence needed for the specific claim, such as the actual delivered message and the checked destination. Do not infer reading or a business outcome from delivery.
When you combine modes, separate them explicitly. An editor view followed by a live test can be useful, but the transition needs a label. Otherwise the edit may imply that the preview itself sent the message.
The current chat-flow guide describes supported capabilities and eligibility. Verify the feature, plan and account conditions for your recording. Do not include an internal or unreleased control as though every viewer can use it.
Label edits that change the viewer’s perception of the process. If you remove waiting time, say that the footage is shortened. If you rearrange steps for explanation, avoid presenting the edited sequence as an uninterrupted transaction. A clean demo can still be honest about its construction.
A six-shot storyboard for one resource choice
Each shot should answer a different question: what is being demonstrated, what is configured, what input is supplied, what branch follows, what destination appears and what remains unproven.
The storyboard below assumes Preview is used to explain logic. An optional live delivery test would be a separately labeled recording, not something implied by these six shots.
Keep the viewer’s attention on one decision. Zoom enough to make the relevant text legible, but preserve the context that identifies the mode and control. If a crop hides the Preview label, add an accurate persistent label to the edited footage.
For the destination shot, show the prepared resource page separately and label it as a destination inspection. Do not edit it as though Preview opened and delivered the resource unless the actual observed behavior supports that statement. The connection you are explaining is the configured destination, not an invented delivery event.
Write the narration in the present tense only for behavior actually visible. “This choice is configured to lead to the checklist” is appropriate for a configuration view. “The customer has received the checklist” needs a different kind of evidence.
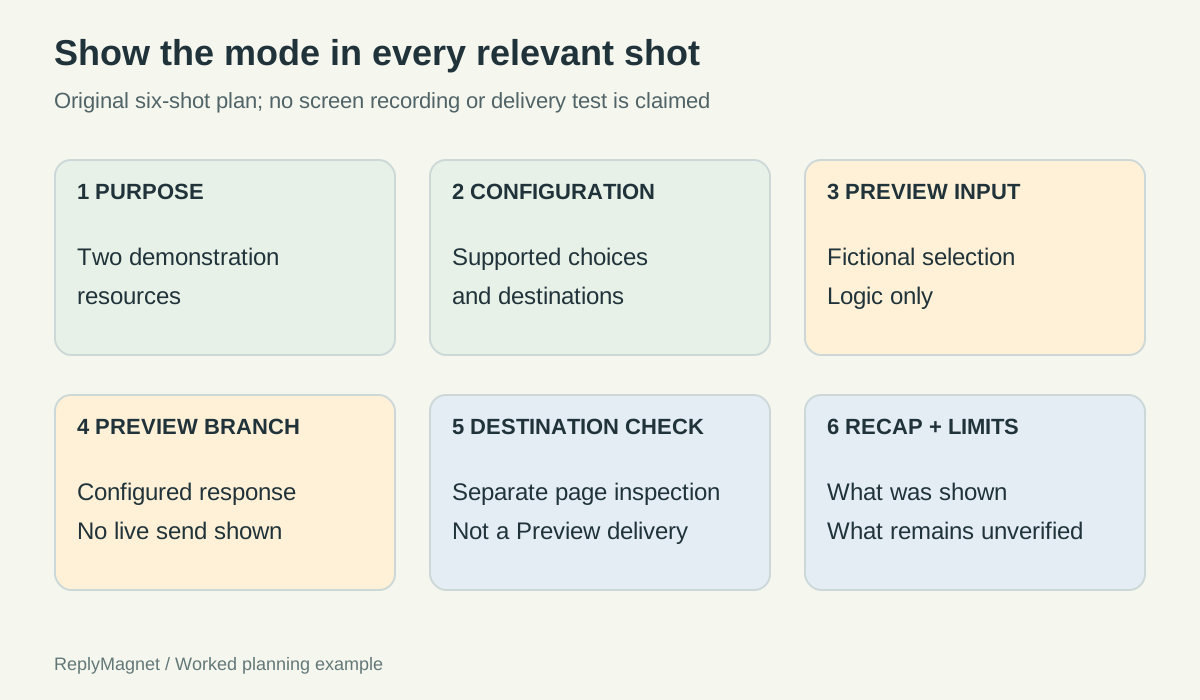
Original storyboard diagram. It is a production plan, not fabricated product footage or evidence that a live test occurred.
Original six-shot Preview storyboard. No recording or delivery test is claimed.
Shot
1. Purpose
- Show
- Two named demonstration resources
- Label or narration boundary
- Fictional scenario; one choice-routing capability
Shot
2. Configuration
- Show
- The supported choices and their routes
- Label or narration boundary
- Current editor; relevant controls only
Shot
3. Input
- Show
- An example choice supplied in Preview
- Label or narration boundary
- Preview: logic demonstration
Shot
4. Branch
- Show
- The corresponding configured response
- Label or narration boundary
- Shows logic, not Instagram delivery
Shot
5. Destination
- Show
- Separate inspection of the demo resource page
- Label or narration boundary
- Destination check, not a Preview send
Shot
6. Recap
- Show
- Choice, selected route and remaining checks
- Label or narration boundary
- Live delivery and external outcomes not established
Inspect the final edit for claims the raw footage did not make
Headlines, captions, speed changes and neighboring shots can imply more than the screen recording supports. Review the complete composition, not only the original capture.
A headline such as “From comment to customer in seconds” introduces a business outcome and timing claim that the two-resource Preview does not establish. A more accurate headline is “How a resource choice selects a different reply.” It tells the viewer what the demonstration actually explains.
Read every overlay and caption as a claim. “Delivered,” “verified,” “booked” and “subscribed” have meanings that may belong to other systems. Use them only when the recording or accompanying evidence establishes the relevant state.
Watch the video without narration. Does the sequence imply that a simulated response appeared in a customer inbox? Then listen without looking. Does the narration promise an outcome the screen never verifies? These two passes can reveal different errors.
For still images, provide a text alternative that communicates the relevant information. W3C’s image guidance distinguishes informative images from decorative ones and explains why their text alternatives differ. A screenshot’s useful description might name the selected option and response, while its caption identifies that it is Preview.
Do not publish a blurry screen merely because it contains a real interface. If the feature cannot be read at the intended size, use a closer authentic crop with enough context, add a readable explanation or choose a native explanatory diagram. Keep the diagram labeled as a diagram.
Google’s helpful-content guidance supports useful original explanation. It does not make a staged demo evidence of customer results. For outcome storytelling, the customer-story evidence guide covers the separate records needed.
Release the demo with a small evidence record
Keep the version, mode, example-data status and reviewed claims with the published file. Recheck material behavior when the product or recorded workflow changes.
Before publication, answer five practical questions. Is the capability available under the conditions stated? Is the recording mode accurately labeled? Is all visible data appropriate to publish? Does every destination match the promise? Does the final wording stay within what was shown or separately verified?
Have someone who did not edit the footage review those questions against the final export. The reviewer should not need the producer in the room to explain that “delivered” really meant “previewed.” Correct the wording or evidence before release.
Keep a concise production note with the recording date, product version or relevant release, mode, sample-data inventory and location of the final file. If an actual delivery test was performed separately, record that evidence and its limits separately too. Do not merge it with a Preview record and lose the distinction.
After a product change, inspect whether the demo still teaches the current behavior. A changed label may need a caption update; a changed capability or eligibility may require a new recording. Retaining an old video without context can mislead a viewer even when it was accurate on the day it was made.
The demo is ready when a viewer can explain what happened, why it happened and what has not been established. That clarity is more persuasive than a polished sequence that turns example data into imaginary customer evidence.